How To… | Microsoft Teams
Microsoft Teams is an Office 365 app that allows you to collaborate with colleagues, have conversations, meetings and calls with colleagues virtually, share and store files and stay up to date with the progress of work across your team.
Teams can be across departments, for a specific project or working group and can be created and managed easily.
Please note: The guidance given below is based on use of the desktop version of Teams, but is also mostly applicable to the mobile app. Some features may vary.
Why should I use Teams?
- Share and store files with specific groups of colleagues.
- Edit live documents and collaborate with other users in real-time.
- Keep all of your team’s files in one place with 1TB of storage available.
- All stored documents are secure, and can only be accessed by members of your Team.
- Collaborate with external contacts, who can be added to your Team.
- Schedule and facilitate physical, audio and video meetings from Teams.
- Text Chat with University colleagues and Team members.
Contents
Setting a Team to Private/Public
How do I set up a meeting or conference call?
How do I access Teams?
![]()
You can get to Teams by visiting 365.lincoln.ac.uk and signing in using your University email and password. Then select the purple Microsoft Teams Icon.
When you access Teams, you will have the option to download Teams to your computer. If you are using a personal computer, or a University one that you do not share, you can download Teams. However, if you share your Computer with other users, please do not download Teams; instead, please continue to use 365. lincoln.ac.uk.
You can also download desktop and mobile apps, giving you access to all files and conversations on the go!
Teams, Channels & Tabs
Teams
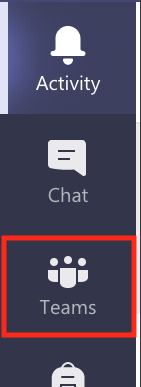
Teams are created groups of users, usually grouped together by other users. To see any Teams you are a part of, click on the Teams icon/tab on the left side of the screen (bottom on mobile). From here, you can create a new Team by clicking the Join or create team button in the top-right corner to set up a new Team or join an existing one.
Channels
When you click on a team, you will see any Channels that have been created in that Team. Channels are a great way of splitting up the focus of discussion topics. For example, one channel could be created for each different piece of work that your team is doing. The Team owner can add or delete channels by clicking the three dots next to the Team’s name, and clicking Add Channel.
Tabs
When you click on a channel, you will see any conversations that have taken place. At the top of the screen, you will see Tabs including a Conversations tab and a Files tab. More tabs can be added to personalise the channel by clicking the + icon.
Joining/Leaving a Team
Joining
If you have been added to a team by a University colleague, you will receive an email. Click the link in the email to access Teams on 365.lincoln.ac.uk. You can also join existing Teams by clicking on the Join or create team button in the top-right corner and searching for one. Note that you will first need permission from the Team owner to be allowed access to the Team.
Once you join a Team, you will then be able to view any conversations and files that have been shared by the Team so far.
Leaving
If you would like to leave a team, simply click the three dots next to the Team name, and select ‘Leave the Team’. You will be asked if you are sure – click on ‘Leave the Team‘ to confirm.
Creating a Team
When you first visit Teams, you will be asked if you would like to create a Team. If you would like to do this, choose an appropriate name and team members, then click Save.
If you are already a member of a Team and would like to create another, click ‘Join or create team’ at the top-right of the screen and click ‘Create a Team’.

- Choose the type of team you would like, then choose an appropriate name.
- You can then add any description, and decide if you would like your Team to be private, or public* (meaning anybody in the University can join your Team). Click ‘Next’.
- Choose who you would like to be in your Team by typing their names into the box, selecting them when they appear and then clicking ‘Add‘.
*Please Note: If your Team is set as public, any University users can join your Team and see its contents. If you are working with sensitive or private data to be shared only with a select group of colleagues, always set your Team to private and only invite users who are required.
Inviting new Team members

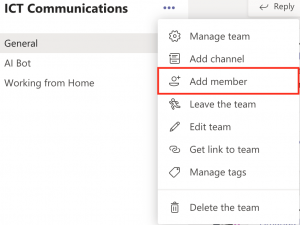
If you wish to invite a new member to your Team, click on the three dots next to your Team name, then select Add member.
Start typing a name, distribution list or security group to add to your team. You can also add people outside your organisation as guests by typing their email addresses.
Important: Any new members of your Team will be able to see any previous posts, conversations and files in the Team. It is important to make sure before adding a user that any sensitive or private information is suitable for them to see/have access to.
Setting a Team to Private/Public
Once you have a Team set up, you can change the Privacy to either Private or Public.
What is the difference between Private and Public?
By setting your Team to Private, only users invited to the Team by Team Owners will be able to access the files, conversations and posts in the Team. By setting your Team to Public, all University users – staff and students – will be able to join and access everything within the Team, including past posts and conversations.
Changing your Team’s privacy
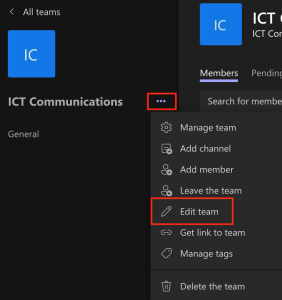
To change the privacy setting on your Team, go to the team name and select the More options ellipsis (…). Then click on Edit team toward the bottom of the menu. Under Privacy, select either Public* or Private.

*Please Note: If your Team is set as public, any University users can join your Team and see its contents. If you are working with sensitive or private data to be shared only with a select group of colleagues, always set your Team to private and only invite users who are required.
Sending Messages
You can send messages from any Channel to members of the Team you are in.
- Select a Team you wish to post a message to from the “Teams” tab.
- To start a new conversation in that Team, click on the “New Conversation” button at the bottom of the Channel page.
- Type your message in the box at the bottom of the page and click on the paper aeroplane (send) icon. You can also add attachments, emoji or other media such as animated gifs to your message by selecting the relevant icon.
Tip: To reply to existing conversations in the Channel, click on “reply” at the bottom of any conversation you wish to add to.
If you would like to target anybody particular, type an @ symbol, then type their name (e.g. @John Smith) and select the user from the names that appear in the pop-up box. After sending the message, the user you select will be notified that you have sent them a message.
Chat
 You can also use text chat to send instant messages to individuals or groups separate from Teams and Channels.
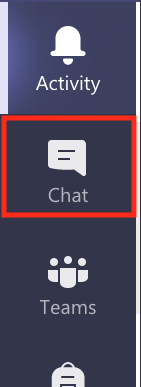
- Select the “Chat” tab on the left side of the screen.
- To start a new chat, click on the New Chat icon (the pen and paper) at the top of your chat list (the white column).
- Enter the name of a single user, or multiple users you wish to message in the bar that appears.
- Click on the user(s) you wish to message from the box that appears, then type your message in the box at the bottom of the chat window.
- Press Enter (return) or click on the paper aeroplane (send) icon to send your message. You can also add attachments, emoji or other media such as animated gifs to your message by selecting the relevant icon.
These messages are instant and will immediately notify the user(s) you have sent a message to.
Video/Audio Call
If you wish to start an instant video or audio call with someone, open a chat window with that person (this can be one you’ve previously used to type messages in) and click on the purple video or phone icon buttons in the top-right of the window.

This will notify the user you are calling instantly – as it would with a standard phone call. During the call you will be able to customise your options as you do in other Teams meetings. You can also toggle your audio and video on and off during the call.
More Resources
Top Tips | Microsoft Teams – covers useful tips such as how to invite external guests to meetings, change/blur your background in video calls, testing your audio and video devices before a meeting, and more!
How To… | Teams Breakout Rooms – our guide on setting up and managing breakout rooms in Teams meetings.
How To… | Sharing Permissions in Office 365 – our guide on setting permissions in Office 365 applications including Teams and OneDrive.
Microsoft Teams video training – Office Support – offers a range of video guides on the official Microsoft Office Support site.
