How To… | Set Automatic Replies
Instructions on how to set and Out of Office or an Automatic Reply vary between operating systems and versions of Outlook. Choose your relevant instructions from the options below. Instructions for setting an Automatic Reply or Out of Office on a shared mailbox are listed at the bottom of this page.
Outlook 365 – Web Version (365.lincoln.ac.uk)
 Click on the Settings Cog in the top-right side of the screen, then select View all Outlook settings at the bottom of the sidebar.
- Select Automatic replies (in the Email tab).
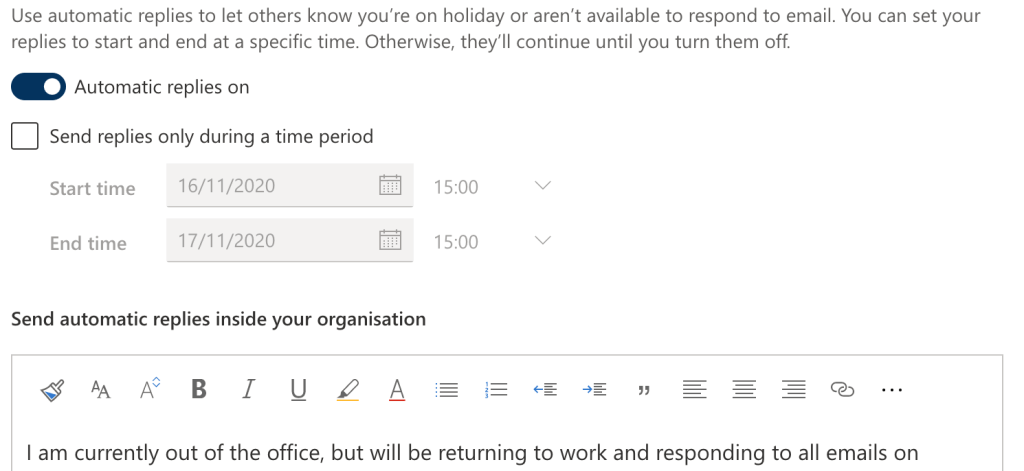
- Click on the Turn on Automatic Replies toggle button.
- Fill in the text box that appears with your automatic reply/out of office message.
- If you wish to send your automatic reply for a set period of time, select and customise the start time and end time in the drop down calendar menus above the text box.
- The automatic reply you have written will only be sent to other University of Lincoln accounts if they send you an email.
- If you wish to send Automatic Replies to people from outside of the University, ensure you check the Send replies outside your organisation box and fill in the box that appears with a message. You can also select the Send replies only to contacts check box to ensure that only your named contacts will receive your Automatic Replies.

Outlook Desktop Application
On PC
-
- Click on File in the top menu bar.
- Select the Automatic Replies button.
- Turn on automatic replies by clicking on the circle next to Send automatic replies.
- Follow the steps from step 5 below.
On Mac
-
- Click on Tools in the top menu bar.
- Select Automatic Replies.
- Turn on automatic replies by selecting the check box at the top.
- Follow the steps from step 5 below.
Next Steps (PC and Mac)
- Fill in the relevant fields and customise your settings including scheduling automatic replies for a specified period of time.
- If you wish to send your automatic reply for a set period of time, select the check box for sending replies within a time range, then customise the start time and end time in the drop down calendar menus.
- The automatic reply you have written will only be sent to other University of Lincoln accounts if they send you an email.
- If you wish to send Automatic Replies to people from outside of the University, ensure you check the “Send replies outside your organisation” box and fill in the box that appears with a message. You can also select the “Send replies only to contacts” check box to ensure that only your named contacts will receive your Automatic Replies.
Shared Mailboxes
All delegates to a University of Lincoln mailbox are able to manage that mailbox by using the Outlook web app through 365.lincoln.ac.uk. From the web app, you can open the delegated mailbox in a separate tab so that you can manage the settings.
- Log in at 365.lincoln.ac.uk using your University email address and password, and select the Outlook icon.
- Click on your account icon (initials or photo) in the top right of the page.
- Click Open another mailbox…
- Search for the mailbox you wish to open.
- Once you’ve found the mailbox you wish to manage, click Open and the mailbox will open in a new tab.
Setting a shared mailbox Out of Office
From the new tab, you will be able to follow the usual steps for Outlook 365 to set an out of office:
 Click on the Settings Cog in the top-right side of the screen, then select View all Outlook settings at the bottom of the sidebar.
- Select Automatic replies (in the Email tab).
- Click on the Turn on Automatic Replies toggle button.
- Fill in the text box that appears with your automatic reply/out of office message.
- If you wish to send your automatic reply for a set period of time, select and customise the start time and end time in the drop down calendar menus above the text box.
- The automatic reply you have written will only be sent to other University of Lincoln accounts if they send you an email.
- If you wish to send Automatic Replies to people from outside of the University, ensure you check the Send replies outside your organisation box and fill in the box that appears with a message. You can also select the Send replies only to contacts check box to ensure that only your named contacts will receive your Automatic Replies.